Keep Talking and Nobody Explodes Helper
This page is made, with information from varying sources.
Especially thanks to this steam guide: Guide by Xgpmcnp
Especially thanks to this steam guide: Guide by Xgpmcnp
Module Guides
Wires
3 wires:
1: No reds - Second wire2: More than one blue & Last wire isn't white - Last blue wire
Else - Last wire
4 wires
1: More than one red & SN finishes odd - Last red wire
2: No reds & last wire yellow - First wire3: 1 blue - First wire
4: More than one yellow - Last wire
Else - Second wire
5 wires
1: Last wire is black and SN finishes odd - Fourth wire
2: 1 red & More than one yellow - First wire3: No blacks - Second wire
Else - First wire
6 wires
1: No yellow and SN finishes odd - Third wire
2: 1 Yellow & More than one white - Fourth wire3: No reds - Last wire
Else - Fourth wire
Buttons
Follow these steps, and if none works, just hold.
1: Blue and says Abort: Hold the button.
If those doesn't work, hold.
Blue: Release on 4
Yellow: Release on 5
Others: Release on 1
1: Blue and says Abort: Hold the button.
2: 2+ batts and written Detonate: Press and release
3: White and has CAR lit: Hold the button4: Button has 3+ batts and lit FRK: Press and release
5: Red and written Hold: Press and releaseIf those doesn't work, hold.
Blue: Release on 4
Yellow: Release on 5
Others: Release on 1
UPDATE INPUT
Keypads / Symbols
Keypads are quite simple to do, but you can simplify
it even more by spotting certain symbols that only have a single column for them
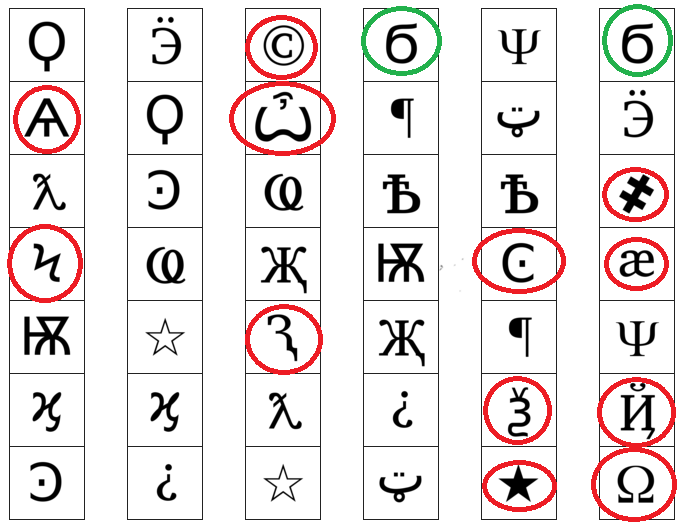
The symbols circled in RED are symbols that only appear in that specific column.
If you see it, you can already tell which column you gotta pick.
The wierd 6s circled in green will ALWAYS be the first one you'll press if they appear,
and only have 2 columns for them. I thought it could be important to note.
If you can remember both of these tips, it will make Symbols much faster,
at least for the expert to select the correct column.
Simon Says
It is recommended to do this module first if it appears, so you don't have to worry about the amount of Strikes.
That way, an experienced Defuser could solve the module on their own by only remembering two easy patterns. The module can have 3 to 5 stages.
Here is a picture of the patterns:
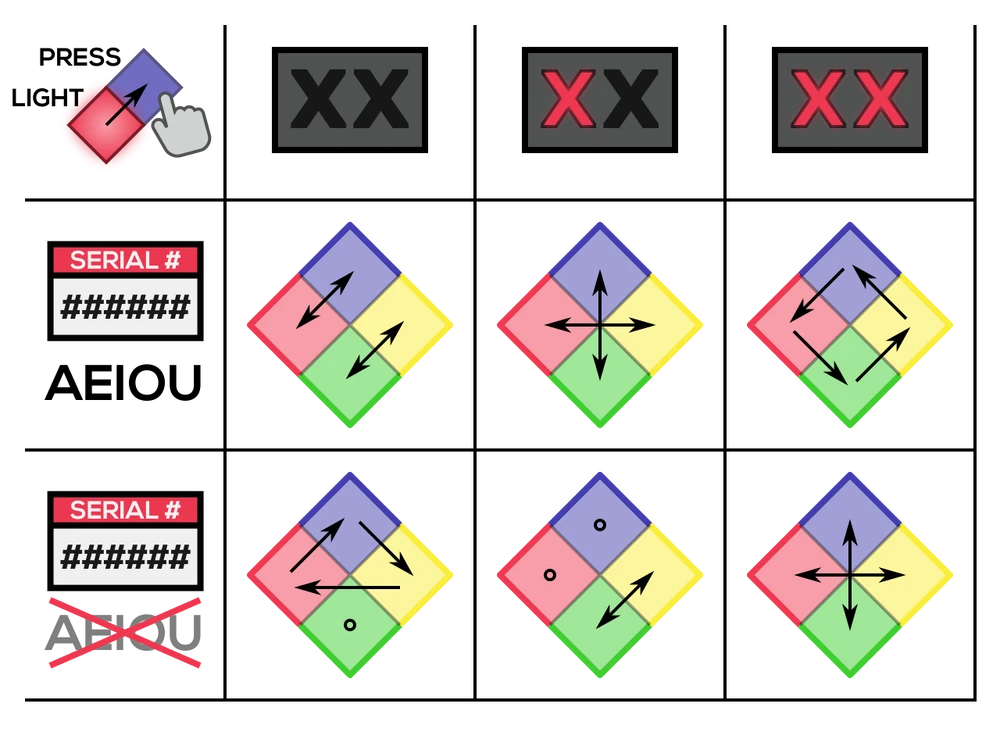
With a bit of practice, a defuser should be able to remember the patterns for Vowel and No Vowel 0 strike and defuse it first thing without any help, similar to The Button.
Here is a picture of the patterns:
With a bit of practice, a defuser should be able to remember the patterns for Vowel and No Vowel 0 strike and defuse it first thing without any help, similar to The Button.
Solver
Below is a solver, that will keep track of your presses and translate them.
It will also change if you gain strikes.
It will also change if you gain strikes.
1
2
3
4
5
Who's on First
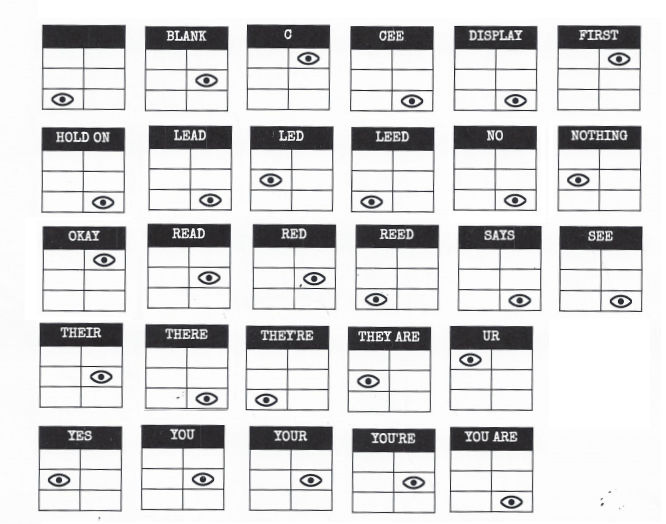
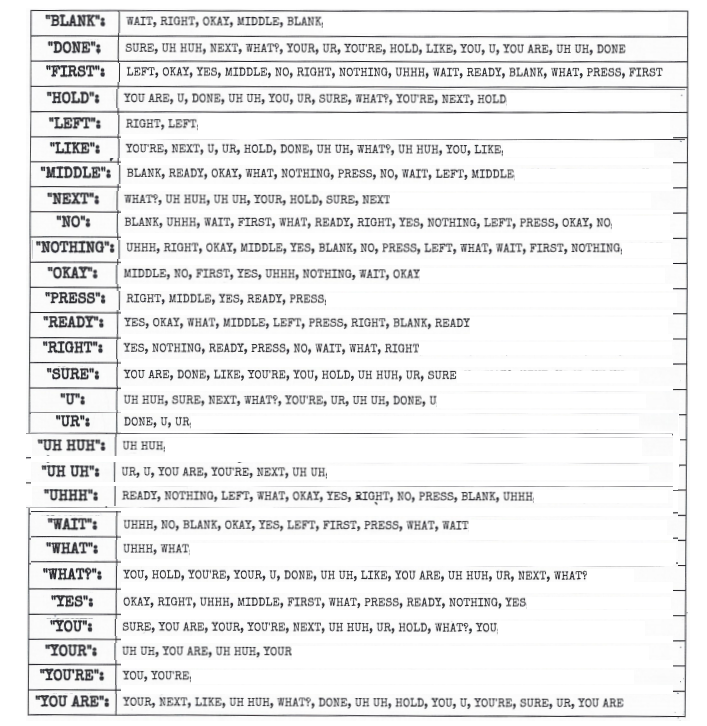
Memory
This list will shorten the sentences for faster reading. I will add some tips for it under the list.
Stage 1
1: Position 2
2: Position 2
3: Position 3
4: Position 4
Stage 2
1: Number 4
2: Same position as Stage 1
3: Position 1
4: Same position as Stage 1
Stage 3
1: Same number as Stage 2
2: Same number as Stage 1
3: Position 3
4: Number 4
Stage 4
1: Same position as Stage 1
2: Position 1
3: Same position as Stage 2
4: Same position as Stage 2
Stage 5
1: Same number as Stage 1
2: Same number as Stage 2
3: Same number as Stage 4
4: Same number as Stage 3
Things to remember:
Position of Stage 1 and Stage 2
Numbers of all stages (For stage 5)
Label
Position
TODO:
input stage and given number to receive answer.
Morse Code
It is not necessary to fully translate the words, as the first 2-3 letters usually give you the correct word, as follows:be 3.600 MHz
bi 3.552 MHz
bom 3.565 MHz
box 3.535 MHz
bre 3.572 MHz
bri 3.575 MHz
f 3.555 MHz
h 3.515 MHz
l 3.542 MHz
sh 3.505 MHz
sl 3.522 MHz
ste 3.582 MHz
sti 3.592 MHz
str 3.545 MHz
t 3.532 MHz
v 3.595 MHz
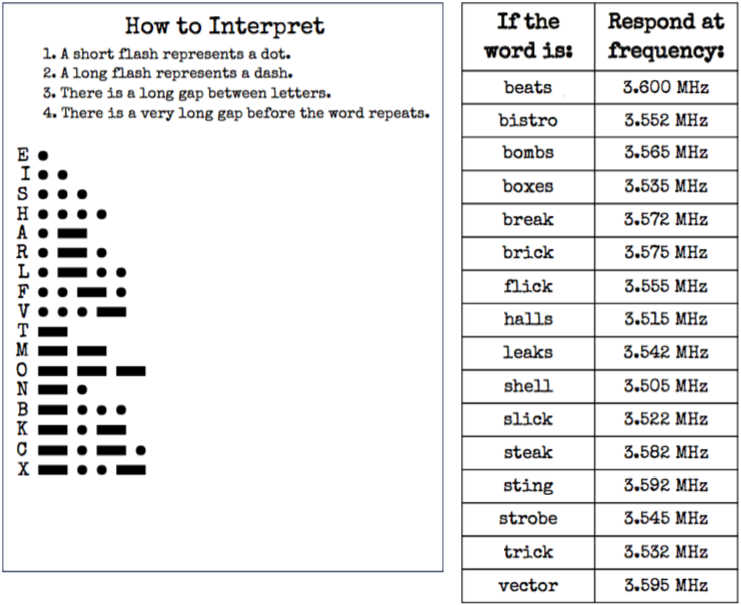
Morse Code Translator
. = short, - = long.Use space between letters.
Translation:
Possible words:
Complicated Wires
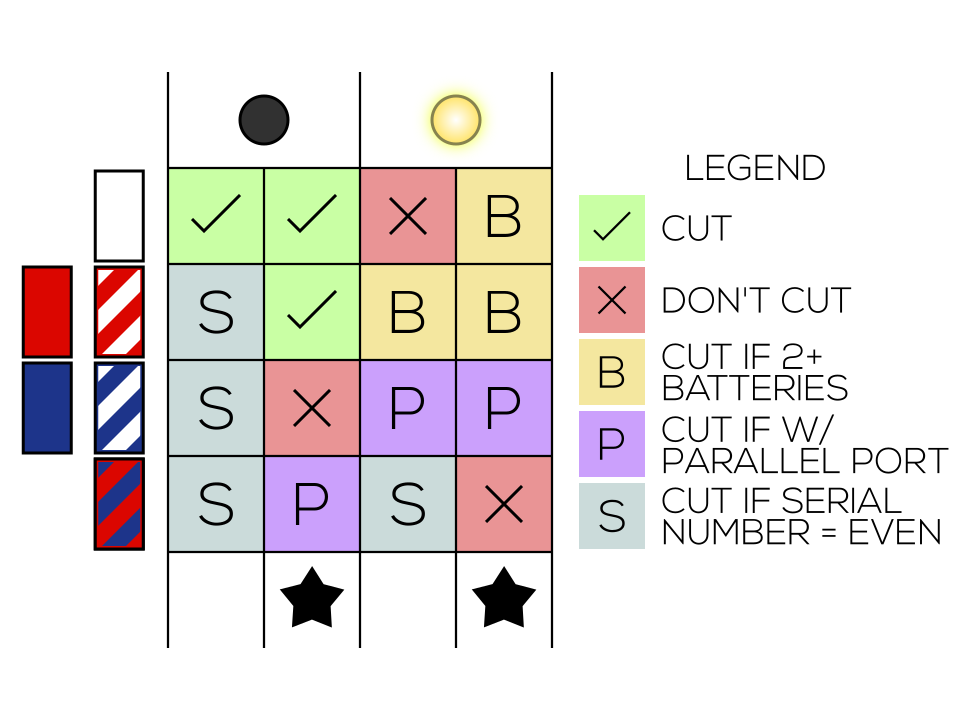


WHITE
CUT
CUT
DON'T CUT
CUT IF 2+B
RED / RED STRIPE
CUT IF SERIAL
CUT
CUT IF 2+B
CUT IF 2+B
BLUE / BLUE STRIPE
CUT IF SERIAL
DON'T CUT
CUT IF PARALLEL
CUT IF PARALLEL
RED/BLUE
CUT IF SERIAL
CUT IF PARALLEL
CUT IF SERIAL
DON'T CUT
★
★
Wire Sequence
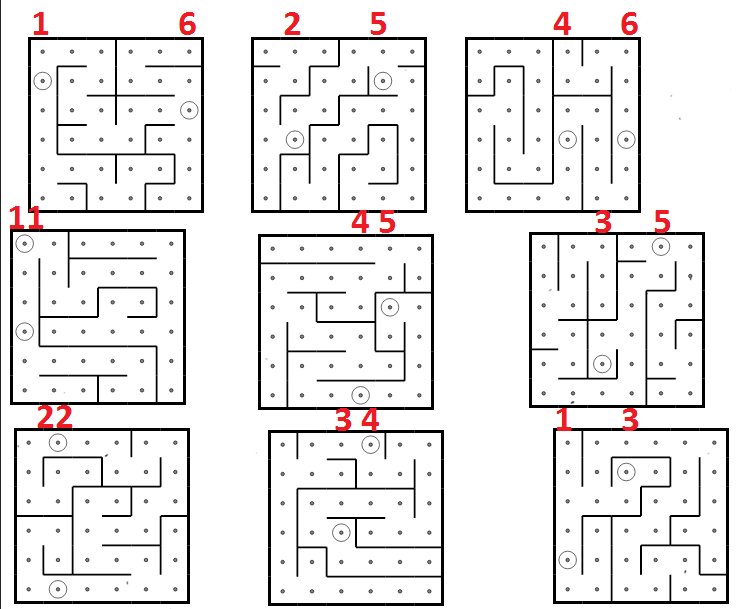
Maze